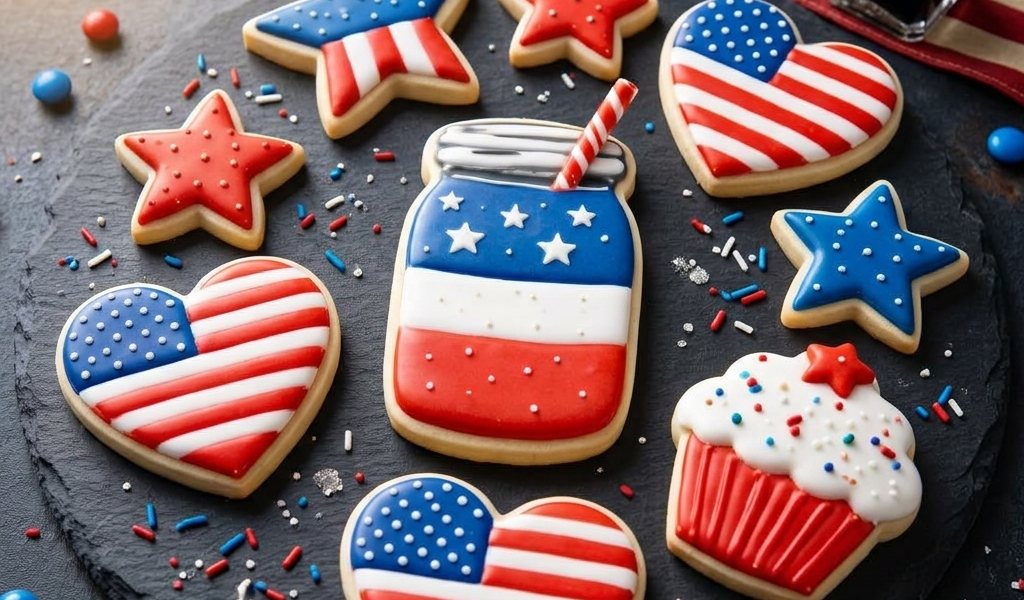
These Fourth of July decorated cookies are my celebration of America’s 250th birthday — and I am so excited to share all six designs with you. 🇺🇸
America’s 250th birthday called for something special. 🇺🇸
Two hundred and fifty years. I keep saying that number out loud because it doesn’t feel real. America’s 250th birthday — the semiquincentennial, a word I had to look up and am now slightly obsessed with — is happening this year, in 2026, and I wanted to make something worthy of the occasion.
So I made cut-out sugar cookies. Six designs, all red white and blue, all decorated with royal icing, and honestly some of the most fun I’ve had at my decorating table in a long time.
In this post I’m walking you through every single design step by step — from the beginner-friendly solid stars all the way to the showstopper mason jar with the striped straw. Whether you’re making one design or all six, you’ll have everything you need right here.
Let’s celebrate 250 years in royal icing. 🇺🇸
Before We Start: The Essentials
Your Cookie Base
Every one of these designs starts with a good cutout cookie that holds its shape and doesn’t spread. My go-to recipe is linked below — it’s the one I use for every decorated cookie I make.
Shapes you’ll need for this set: Heart (medium, about 3″) Star (medium, about 3″ — and a few smaller ones) Mason jar (or tall oval — trace a real mason jar onto cardboard to make your own template) Cupcake Rectangle or wave/scalloped rectangle for the flag design
Royal Icing Colors You’ll Need
Bright Red — AmeriColor Super Red, add a touch of Tulip Red for extra vibrancy Bright White — no coloring needed, just your base royal icing Navy Blue — AmeriColor Navy, use less than you think — it deepens as it dries Silver/Gray — AmeriColor Silver, just a tiny amount for the mason jar lid
Royal Icing Consistencies
Every design uses two consistencies:
Outline (stiff): Holds a firm peak. Doesn’t flow. Think toothpaste. Used to pipe borders, stripes, and detail lines.
Flood (thin): Flows and self-levels. Add water a teaspoon at a time until a drizzle disappears back into the bowl in about 10 seconds — the 10-second rule.
Tools You’ll Need
Disposable piping bags Tips: #1 for fine details and stripes, #2 for flooding and outlines Squeeze bottles for flooding large areas Toothpick or cookie scribe for popping bubbles White nonpareils or white dot sugar pearls — these are the stars on most of these designs and they are so much easier than piping individual stars Red and blue sprinkles for the cupcake cookie
A Note on Timing
Decorated cookies like these require patience between layers. Here’s my general rule:
After flooding: Wait minimum 4 hours before adding details on top. Overnight is better and I almost always do overnight. After piping stripes or details: Wait 1–2 hours before handling. Full dry time before packaging: 24 hours.
I usually flood all my cookies on Day 1, add details on Day 2, and package or serve on Day 3. For a party on July 4th, start these on July 1st.
Design 1: Fourth of July Decorated Cookies — Solid Stars
Difficulty: Easy | Time: 30 min + drying
These are your entry point — simple, bold, and beautiful. Two versions: solid navy or solid red, both with white dot accents.
Step by step:
Outline your star cookie in navy (or red) icing using a #2 tip. Keep your line smooth and follow the points carefully — take your time here, the outline is what makes it look clean.
Flood the entire star with navy (or red) flood icing. Use a toothpick to push icing into the points and pop any bubbles.
While the flood icing is still wet, immediately place white nonpareils or dot pearls in a scattered pattern across the star. They sink slightly into the wet icing and stay put as it dries — no piping required.
Let dry completely, at least 4 hours.
That’s it. These are genuinely that simple and they look incredible grouped together on a platter. Make plenty of these — they fill in gaps beautifully on a dessert table and they’re great for kids to help decorate.
Design 2: Design 1: Fourth of July Decorated Cookies — Flag Heart Cookies
Difficulty: Intermediate | Time: 45 min active + overnight drying
The heart-shaped flag cookie is the most shareable design in this whole set. It photographs beautifully and people absolutely love the heart and flag combination.
Day 1 — Base layers:
Outline the entire heart in white icing. Flood with white. Let dry overnight. This clean white base is essential — don’t skip the full dry time.
Once fully dry, pipe your red stripes across the lower two thirds of the heart using red outline icing and a #1 tip. Pipe horizontal lines evenly spaced, leaving white gaps between each stripe. You want roughly 5–7 red stripes depending on your cookie size. Tip: lightly score the white base with a toothpick as a guide before you pipe — makes the stripes much more even.
In the upper left corner, outline a rounded canton shape in navy. Flood with navy flood icing. While still wet, immediately place white dot pearls scattered across the navy section for stars.
Let dry completely — at least 4 hours, ideally overnight again.
The result: a classic American flag heart that looks like you spent hours on it. The secret is that most of the work is just waiting for layers to dry.
Design 3: Design 1: Fourth of July Decorated Cookies — Layered Patriotic Star
Difficulty: Intermediate | Time: 45 min active + overnight drying
This one is my personal favorite in the set. The bold color-block stripe through the middle makes it look incredibly professional — and it’s more achievable than it looks.
The design: navy top half of the star with white dot stars, red stripes on the bottom half, with a clean horizontal line dividing them.
Day 1: Outline and flood the entire star in white. This is your base — dry completely overnight.
Day 2: Using navy flood icing, carefully flood just the top half of the star — from the middle horizontal point up through the top point and the two upper side points. Use a toothpick to guide the icing right up to the center line without crossing it. This is easier than it sounds — work slowly from the center line outward.
While the navy is still wet, immediately drop white nonpareils across the navy section for stars.
Let the navy dry 4–6 hours.
Using red outline icing and a #1 tip, pipe horizontal stripes across the bottom half of the star — the lower two points and the bottom section. Leave white gaps between the red stripes for the classic flag stripe effect.
Let dry completely.
The clean line between navy and red/white stripes is what makes this cookie look so sharp. Work carefully and you’ll nail it.
Design 4: Design 1: Fourth of July Decorated Cookies — Flag Rectangle/Wave Cookies
Difficulty: Intermediate | Time: 1 hour active + overnight drying
A classic American flag on a rectangle or wave-cut cookie — clean, recognizable, and great for filling out a platter.
Day 1: Outline and flood the entire cookie in white. Dry overnight.
Day 2: Pipe red stripes horizontally across the cookie with a #1 tip, leaving white gaps. Cover the full cookie top to bottom — you want the full 13-stripe flag look. Roughly 7 red lines on a standard 3×2 inch rectangle.
Let stripes dry 1 hour.
Outline the canton rectangle in the upper left corner in navy. Flood with navy flood icing. While still wet, place white dot pearls for stars.
Let dry completely.
The navy canton will cover the top few red stripes in the upper left — that’s correct and intentional. That’s what a real flag looks like.
Wave/scalloped version: exact same technique on a wave-cut or scalloped rectangle. The curved edge adds a fun, slightly whimsical touch that photographs beautifully.
Design 5: Design 1: Fourth of July Decorated Cookies —Mason Jar with Striped Straw — The Showstopper
Difficulty: Advanced | Time: 1.5 hours active + 2 days drying
This is the cookie everyone will stop and stare at. The mason jar with the red and white striped straw is the centerpiece of the whole set — and while it takes the most time, it is absolutely worth it.
The design: navy top section with white stars, white middle stripe, red bottom section, silver lid, and a red and white striped straw coming out of the top.
Day 1 — Base sections:
Outline the entire mason jar shape in white.
Flood it in three horizontal sections: Top third: navy flood. While wet, place white dot pearls for stars. Middle section: white flood (about one quarter of the jar height — this is your white stripe). Bottom half: red flood.
Work one section at a time. Pipe a dividing line between sections before flooding to keep them crisp. A toothpick along the boundary helps keep colors from bleeding.
Let dry overnight — this one really needs the full dry time before adding details.
Day 2 — Details:
The lid: outline the lid and band at the top of the jar in silver/gray icing. Flood with a thin silver flood. Add a few fine horizontal lines across it with a #1 tip while slightly wet to suggest the screw-top texture.
The straw: using red outline icing and a #1 tip, pipe the straw shape coming up from the lid — a tall thin rectangle. Pipe white diagonal stripes across it. This is the detail that makes the whole cookie — take your time with it. The straw should lean very slightly to the right — not perfectly vertical. This small detail makes it look natural and charming.
Add any final white dot accents or clean up any edges with a damp brush.
Let dry completely — 24 hours before handling or packaging.
This is the cookie you put in the center of your platter. It’s the one people photograph. It’s worth every minute.
Design 6: Design 1: Fourth of July Decorated Cookies — Cupcake Cookies
Difficulty: Intermediate | Time: 45 min active + overnight drying
The cupcake cookie is pure joy — festive, fun, and a little unexpected in a patriotic cookie set. It’s also a great design for kids to help with because the sprinkles on top are very forgiving.
The design: red liner with piped white vertical lines, white frosting top with red and blue sprinkles, and a red star on top.
Day 1:
Outline and flood the cupcake liner section (bottom two thirds) in red. Dry 4 hours.
Pipe white vertical lines down the liner using a #1 tip — evenly spaced, from the top of the liner to the bottom. These represent the ridges of a cupcake liner and make the whole cookie look polished.
Outline and flood the frosting section (top one third) in white. While still wet, immediately scatter red and blue sprinkles across the white frosting section.
While the white frosting is still wet, place one small red star-shaped sprinkle or a red dot pearl right in the center top as a finishing touch.
Let dry completely overnight.
Day 2 (optional detail): Pipe a thin white line along the border between the liner and frosting sections to give it a clean edge.
These are the most fun to make and the most fun to eat.
Putting the Full Set Together
For a party platter: arrange with the mason jar cookie in the center as your focal point. Group the flag hearts together on one side, cluster the stars on the other. Scatter the cupcake cookies throughout. Use a mix of navy and red stars to add color variety.
For a gift box: 1 mason jar cookie, 2 flag hearts, 2 layered stars, 1 cupcake cookie. Fill gaps with small solid stars. Wrap in red tissue paper in a white box with navy ribbon.
For photography — your Pinterest pin: flat lay on a white-painted wood surface. Scatter red and blue sprinkles around the cookies loosely. Shoot from directly above in natural light.
Frequently Asked Questions
How far ahead can I make these? Fully decorated cookies stay fresh 7–10 days in an airtight container at room temperature. Make them up to a week before July 4th.
Can I freeze them? Yes — freeze undecorated baked cookies up to 3 months. Decorated cookies freeze up to 1 month. Thaw overnight inside the closed container to prevent condensation on the icing.
My navy blue is bleeding into the white. Help! Navy is the trickiest color for bleeding. Make sure your base layer is 100% dry — genuinely overnight, not just a few hours. Also make sure your navy icing isn’t too thin.
My stripes aren’t even. How do I fix this? Use a toothpick to lightly score guidelines on your dried base layer before piping. It disappears into the icing but keeps your lines straight.
The mason jar sections are blending together. What went wrong? You need to flood one section, let it set for 15–20 minutes until it has a slight skin, then flood the next. Don’t flood all three sections at once.
Can kids help? Absolutely. Give them the solid star cookies to decorate — outline and flood in one color, then let them place the white dot pearls. They’ll be so proud of the result.
One Last Thing
I love that we get to mark 250 years with something as simple and human as baking. People have been gathering around food to celebrate in this country since before it was a country. There’s something really beautiful about that.
These cookies will be on my table on the Fourth. I hope they make it onto yours too.
Happy America 250. 🇺🇸
Did you make these cookies? I would love to see them! Tag me on Instagram @mrsflourandchalk or share in the comments below.